
Step-by-Step DIY Dining Bench Plans
If you're like me you love the look of Pottery Barn, West Elm and Restoration Hardware, but you hate the sticker price. That's why I created my own furniture and put these DIY dining bench plans together so you can too. Read on to find out how you can craft a dining bench at home with simple materials from your nearest big-box hardware store.I have always loved the look of a dining table with a bench on one side. I think it just helps keep the space less cluttered if you have an open dining area (like we do). All of those tall table backs can really start to close off the space, but a bench tucks neatly away.This bench is very similar in construction to the DIY Pottery Barn Hyde Dining Table Knockoff. The legs are put together first, given shape with the long side aprons, and topped off (in this case) with 2 long planks. We used standard lumber from a big-box home improvement store so I'm pretty sure all of the pieces are pine. After construction, it was sanded down and stained with 3 coats of Minwax (Jacobean color). I used a pre-stain first to try and help keep the coat even. I finished it off with 2 coats of polyurethane.This post is a long time coming and I apologize to those of you who have been waiting to build a bench with your . Here are the detailed plans to help you build a bench of your own.The plans were put together using Google SketchUp and while I tried my hardest to keep all of the measurements exact, sometimes the program just would not work with me. So please follow the measurements and do not rely solely on the photos.Dimensions:52″ wide x 14.5″ deep x 18″ tallSupplies List:* 2 1/2″ Screws* 1 – 4×4 post 8′ length (we used some left overs from the dining table)* 8" of 1 - 1×4 8′ length board (use scraps from the table project if possible)* 1 – 2×2 8′ length board* 2 - 2×4 8′ length board* 1 – 2×8 8′ length boards* Sandpaper (100, 150, and 220)* Wood putty (If you want to cover the screws. We left the screws exposed and they still look great)* Stain, varnish, paint or other finishing product* Paint brushTools:* measuring tape* square* pencil* hammer* safety glasses* hearing protection* mitre saw (or have the hardware store cut your wood for you)* drill* sanderCut List:
A) 4 – 4×4 Posts @ 16.5″ (Legs)B) 2 – 2×4 @ 10″ (Leg Joiners)C) 2 – 2×4 @ 43″ (Side Aprons)D) 4 – 1×4 @ 2″ (End Apron Spacer)E) 2 – 2×4 @ 6″ (End Aprons)F) 3 – 2×2 @ 10″ (Tabletop Supports)G) 2 – 2×4 @ 14.5″ (Breadboard Ends)H) 2 – 2×8 @ approx. 45″ (Benchtop Pieces – Measure the bench before cutting these boards)Instructions:Cut out all boards except H. To get the best fit, you will measure and precisely cut out each of the boards H to fit the bench. Remember, use the 2 1/2″ screws unless otherwise noted and always pre-drill and countersink your screws. Use glue on all joints to keep the table from separating later.Step 1: Attach the end apron spacers (D) into the legs first, because the small space between the legs will make this step difficult later.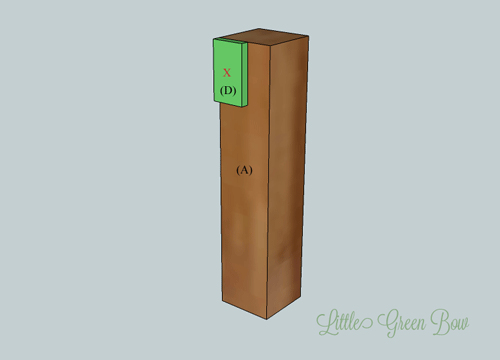 Step 2: Screw the leg joiner (B) to the legs (A) as shown below. Do this on both sets of legs. Leave 1 1/2" of space on the side of the leg joiners so the side aprons fit tightly.
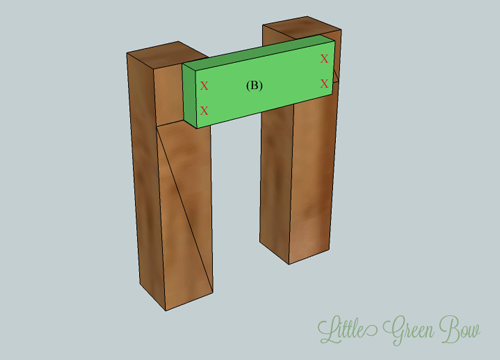 Step 3: Screw the side aprons (C) into the ends of the leg joiners (B) as shown below.
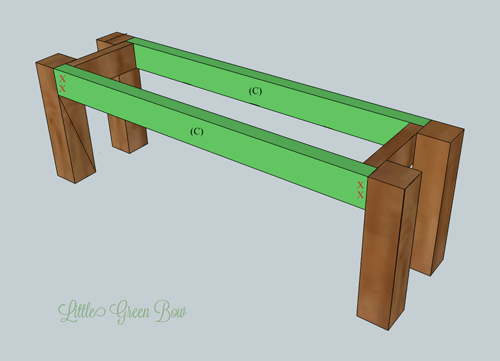 Check for square. Measure from one end diagonally across the table. Then measure on the other diagonal. If the measurements are the same, your table is square. If not, evaluate where you are off and make the necessary corrections.Step 4: Screw the end aprons (E) into the end apron spacers as shown below.
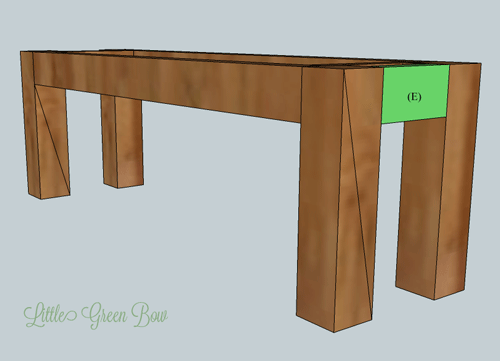 Step 5: Screw in the tabletop supports (F) as shown below, spacing the supports approximately 10″ apart.
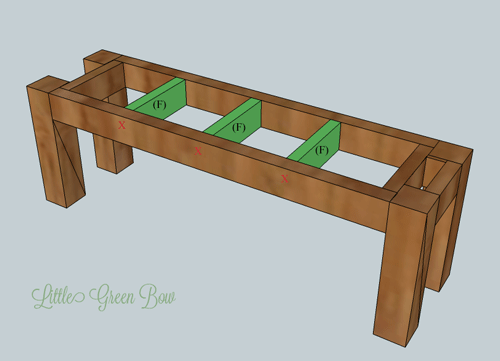 Step 6: Now screw the breadboard ends into the tops of the legs as shown below. The edge of the breadboard is centered on the leg.
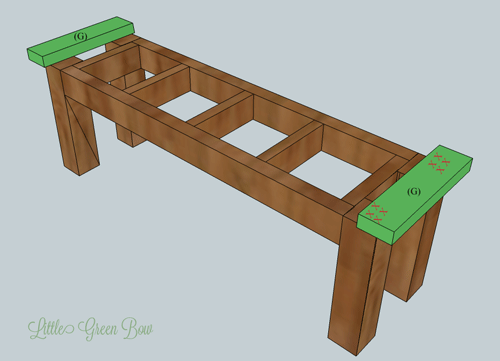 Step 7: Take a length measurement between the breadboard ends. Be very precise and cut your first bench top piece(H). Place the board with one edge centered on the table and screw in place from the bottom through the supports (F). Measure the second bench top and put in place, screwing in through the supports.
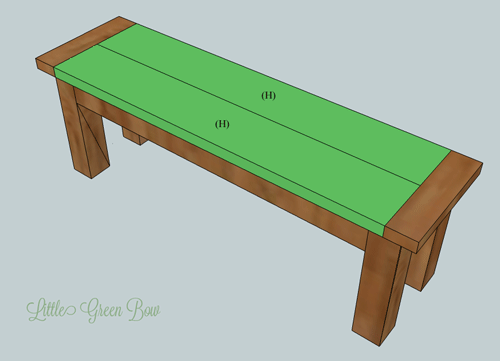 Step 8: Stand back and admire your beautiful bench.Our bench and matching table (pictured below) were stained using Minwax in Jacobean. There is one coat of wood stain primer, three coats of stain and three coats of polyurethane. We built it over a year ago and has held up very well so far.
 I'm linking here:Whipperberry | Tatertots & Jello | ShabbyNest | Be Different, Act Normal | Lolly Jane Boutique | Family Ever After | The Creative Paige | 5 Days, 5 Ways | I Heart Nap Time | C.R.A.F.T | Sew Can Do | Keeping It Simple | Under the Table & Dreaming |Skip to My Lou | Nifty Thrifty Things | Petite Hermine | Home Stories A2Z | Romance on a Dime | A Bowl Full of Lemons | Homework | Tip Junkie | Lil Luna | Ginger Snap Crafts | It's Overflowing | Night Owl Crafting | The Shady Porch | Junk in Their Trunk | Uncommon | The Artsy Girl Connection | Fabulously Flawed | Delightful Order | Today's Creative Blog | One Artsy Mama | Miss Mustard Seed | Classy Clutter | Craft-O-Maniac | Goings on in Texas | Sew Chatty | The Girl Creative | Making the World Cuter | DIY Home Sweet Home | Vintage Mauve | Singing 3 Little Birds | Sugar Bee Crafts | The Creative Crate | Feathered Nest | How to Nest for Less | Mrs. Hines Class